
I am a cake person, no questions about it.
Every year on my birthday, I order a cake so that when I come home drunk after a day of celebrating, I can devour it in peace.
But the past few years, as I’ve made a more conscious effort to focus on my health, I’ve begun to feel awfully guilty and shitty about traditional cake. All the sugar. The artificial ingredients. Ick.
But it’s my birthday, dammit!
This year, my wonderful husband offered to create a recipe that would be in line with my style of eating (I mostly follow a gluten free, primal diet plan). He promised it would be better than a store-bought cake, and man oh man, he did not disappoint!
This cake is absolutely phenomenal, whether you are gluten free or not. Whether you care about added sugar or not. You’re gunna love it either way.
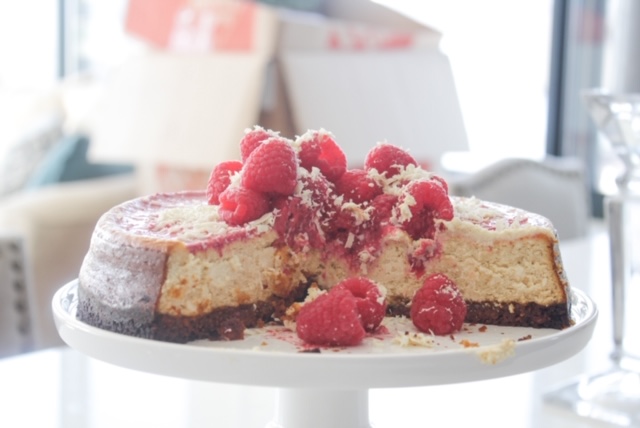
GLUTEN-FREE RASPBERRY WHITE CHOCOLATE CHEESECAKE WITH A BUTTERY MACADAMIA NUT CRUST


Ingredients:
Buttery Macadamia Nut Crust
-10 oz dry roasted and salted macadamia nuts
-2 tbsp. butter, melted
-1 tsp. vanilla extract
-2 tbsp honey
Cheesecake Filling
-3 blocks cream cheese, room temp.
-1/4 cup heavy cream
-2 tbsp. vanilla extract
-2 tbsp. coconut flour
-3/4 cup honey
Raspberry Cream Sauce
-10 oz. frozen raspberries
-1/2 cup heavy cream
-2 tbsp. honey
Garnish
-5 oz. fresh raspberries
-1 oz. white chocolate, shaved
Directions:

Step 1: Preheat oven to 350 degrees.
Step 2: Prepare your crust.
Using a food processor, blend nuts until they become small crumbs. Add remaining crust ingredients to the food processor and blend until it becomes a creamy, almost peanut butter like texture.
Step 3: Pour your crust mixture into a buttered 9″ spring form pan, and spread until even.
Step 4: Bake the crust for 15 minutes, or until browned. Remove from oven and allow to cool for at least 10 minutes.
Step 5: Drop the oven temperature to 325 degrees.
Step 6: Prepare your cheesecake filling.
In a large mixing bowl, add cheesecake filling ingredients and mix until it becomes a creamy, smooth texture. If you have an electric mixer, now is the time to use it!
Step 7: Once your crust has cooled, pour the cheesecake filling mixture on top.
Step 8: Fill a large baking sheet with 1/4″ of water. Place it on the bottom rack in your oven. Place the spring form pan on the top rack and back for 45 minutes.
Step 9: After 45 minutes has elapsed, shut the oven off. DO NOT REMOVE THE CHEESECAKE OR THE BAKING SHEET.
Step 10: Leave the cheesecake in the oven, turned off, for an hour.
Step 11: Remove cheesecake from oven. Allow it to cool on the counter, in the pan, for at least two hours. After, transfer it to the fridge to chill, still in the pan. Chill for at least two hours.
Step 12: Carefully remove cheesecake from spring form pan and transfer to a cake stand.
Step 13: Prepare your raspberry cream sauce.
Add ingredients to a small sauce pan, and cook over medium heat.
Step 14: Transfer sauce to a food processor or blender, and blend until reaching a creamy consistency.
Step 15: Allow your sauce to chill in the fridge for at least 30 minutes. If you pour it onto the cheesecake while still warm, it will ruin your cheesecake.
Step 16: Pour a layer of chilled sauce onto the top of the cake. Use a spoon to spread it out.
Step 17: Prepare your garnish.
Add a pile of fresh raspberries in the center of the cheesecake.
Using a cheese grater, shave white chocolate onto raspberry pile.
Step 18: EAT IT!


Leave a comment